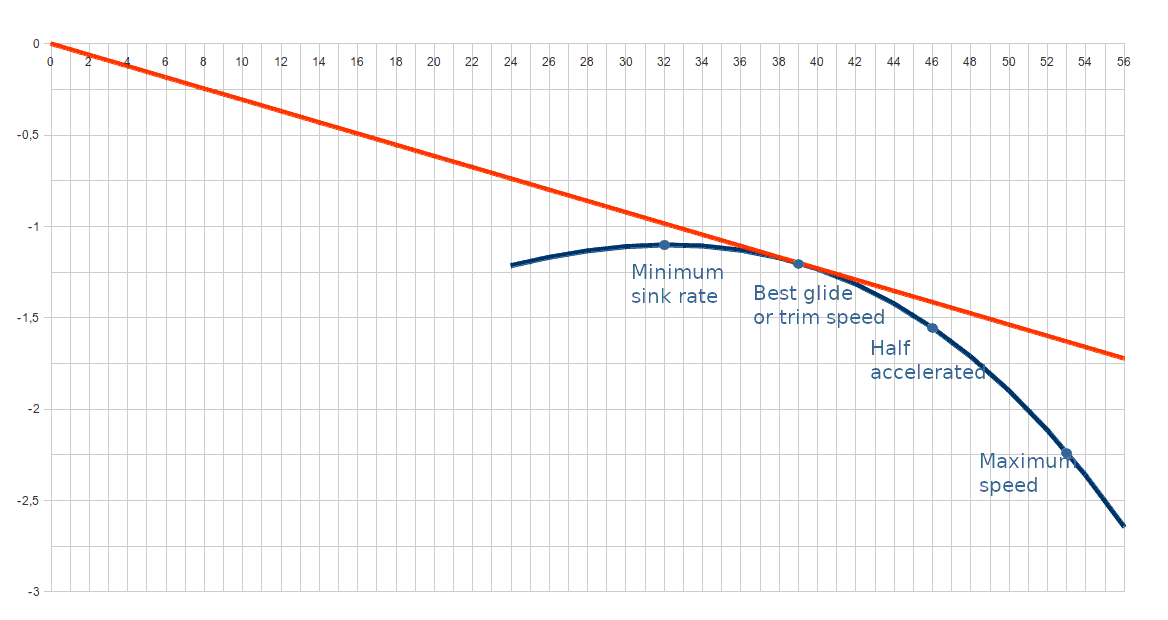
The polar curve of a glider is a graph that represents the sink rate of our glider as a function of air speed in neutral air conditions (without rises or falls). It is necessary to supply the polar curve of your glider to the application for the speed control to work correctly
Keep in mind that the polar curve varies with wing loading and altitude (changes in air density). The application makes the necessary adjustments to adapt the curve to the flight altitude. You must specify the points of the polar curve for the actual in-fligth load in neutral air at sea level. The speed can vary by several km/h within the weight range of your wing as well as the sink rate.
What is speed control? Speed control is a series of speeches or voice messages that the application generates to tell you the speed at which you should fly to maximize glide. These messages do not directly tell you the ground speed at which you should fly, because that would mean that you would have to constantly look at the GPS to adjust the speed, but rather the flight setting that you should have.
What is a flight setting? A flight setting is a specific configuration of the controls you have on your wing. In the case of paragliding these controls are the brakes and the speed bar. Each flight setting corresponds to a specific point on the polar curve and therefore to a specific airspeed and sink rate in neutral air. The application differentiates between four different flight settings designed primarily for paragliding:
-
Minimum sink: It is the pre-stall flight setting in which the glider floats at its maximum. This point is the one at which the polar curve reaches its maximum. The speed control will recommend you that you should fly at this speed with the message:
Brake one -
Best glide: It is the flight settings in which the wing reaches maximum glide. In a paraglider this configuration is achieved by releasing the brakes. The speed control will tell you that you should fly at this speed with the message:
Trim speed -
Half speed bar: It is an accelerated flight configuration, but not to the maximum. In this configuration the sink rate is higher than that of the best glide but it is not excessive so as not to penalize the glide too much. The speed control will tell you that you should fly at this speed with the message:
Speed up one -
Full speed: It is the flight configuration in which you go on full speed bar, bringing the wing to reach the maximum speed and also the highest sink rate. The speed control will tell you that you should fly at this speed with the message:
Speed up two
Each of these settings is represented as a point on the graph above. It is these four points of the porlar curve of our wing that we will have to supply to the application. Actually what we will have to supply is the air speed and the sink rate for each point. In total 8 numbers.
This approach to flight control has many advantages but it also has a drawback: It is not exact. Let me explain: The optimal flight speed to maximize gliding can be any point within the speed range of our wing. If this point is between two flight settings, the application chooses the one that is closest to the optimal one. In the graph above: Suppose the optimal flight speed was 42 kmh. The application would generate the message: “Trim speed” although the air speed of this setting is 39 kmh and not 42 kmh. In the case of a paraglider, the distance in kmh between the two sequential flight settings is around 15 kmh and therefore the maximum error in speed that we can make using this approach is 7.5 kmh.
We have plans to add the option to maximize speed in future versions of the application. It is what we know as the MacReady ring. It is used in competition when what we want is not to go as far as possible but as soon as possible.
How do we supply the curve points to the application?
-
Open the application drop-down menu by clicking on the three dots at the top right of the screen or on the floating blue button at the bottom right of the screen.
-
We select
settingsoption. -
In the settings screen scroll down until you see the option
wing specificationsand we click on there -
In the wing specifications screen we can specify our wing model, if we would use it for free or powered flight and there si also one section for each of the four flight settings noted above.
-
There are two subsections in each one called
SpeedandSink rate. Clicking on them it will open an edit box where you can enter the corresponding value using a decimal number. Please be careful that a point and not a comma is used as separator for the decimal places. Click onOKto set the new value.Suppose that the points of the polar curve corresponding to each of the configurations are those in the graph above, that the unit of speed is km/h and the unit of altitude is meters. Then the values that we would have to enter would be:
Minimum sink(Speed): 32
Minimum sink(Sink rate): 1.1
Best glide(Speed): 39
Best glide(Sink rate): 1.2
Half speed bar(Speed): 46
Half speed bar(Sink rate): 1.55
Full speed(Speed): 53
Full speed(Sink rate): 2.25
Para modificar las unidades en las que introduces la información y recibes los datos de los mensajes vocales de la aplicación consulta esta página.
-
Once you have entered all the corresponding speeds and sink rates, you must click on the Android navigation button ‘Back’ twice, until you return to the main screen of the application, for the changes to be applied. At that point the application might display a dialog like this:
Some settings cannot be applied, using defaultsIt means that the data you have entered is not correct because it cannot belong to the polar curve of a glider. The polar curve is a concave and decreasing curve. If the points you have supplied cannot fit into a concave and decreasing curve, they will not be accepted and the original points will be restored.